The Analogue Era
The idea of recording sounds and music became a reality at the end of the 19th century. In 1877, Thomas Edison invented the first sound-recording mechanism practical for commercial use. Edison's device consisted of a phonograph that used a wax cylinder, about five to six inches long, and utilized a recording technique called hill-and-dale. In the decade that followed the invention of the phonograph, other recording devices were created such as a flat recording disc of wax-coated cardboard by Alexander Bell, Chichester Bell and Charles Tainter, and the disc phonograph by Emile Berliner (Mumma et al [no date]).
The first recording devices were used mainly for communications, business, stenography, telegraphy and entertainment to some extent. Berliner was the first to use his recording device for entertainment and cultural purposes. Berliner's machine would become the standard method of commercial disc recording until the introduction of the stereophonic recording in the 1950s (Ibidem).
In 1898, Valdemar Poulsen demonstrated the principle for magnetic recording in his telegraphone. However, it wasn't until the advent of electronic amplification that the musical potential of this technique could be realised. In 1947, the Ampex Corporation, produced the first high quality magnetic recorder for studio use in the USA. The main advantages of tape over the disc phonograph were the relative ease of editing and the substantially lower cost (Ibidem).
Around this time, some important changes occurred in the area of disc recording with the development of polyester plastics, called polyvinyl chloride (PVC) or "vinyl", which had a smaller grain structure than shellac (of which 78 r.p.m. discs were commonly made). Vinyl discs allowed the recording of a wider range of frequencies and dynamics, and suffered considerably less from surface noise. The new discs gave better fidelity and were less fragile than the previous ones (Ibidem).
The arrival of the vinyl led to the fixing of new standard speeds for recording and playback. In 1948 Columbia introduced the 331/3 r.p.m. “long-playing” disc which allowed up to 25 minutes of music on each side. The 12 inch, 331/3 r.p.m, quickly became standard replacing multiple-disc albums of 78 r.p.m. The 45 r.p.m., 7-inch “single”, replaced the 78 r.p.m. “single” disc (with a similar playing time of two to four minutes). Two variants of the 45 r.p.m. disc would be introduced such as the 7-inch EP (two tracks on each side, running for twice as long as single) and the 12-inch single that had a playing time of 12 minutes per side (Ibidem).
A decrease in the cost of materials, manufacturing, and distribution made these discs more affordable than before. The use of easily edited magnetic tape also improved the efficiency of the record companies’ operations. These factors led to the expansion of the recording industry.
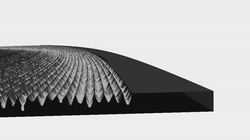
In 1957 the recording industry introduced stereophonic discs. The technique of stereophonic (stereo) recording and playback produces the effect of sound coming from different directions in a three-dimensional space. This technique could only be developed after the invention of the two-track magnetic tape. The reason behind it is that in order to create this effect, two channels have to be recorded and played independently. On a microgroove disc the two channels are recorded as independent variations in the left and right walls of a V-shaped groove (Picture on the right). Although some stereo recordings were made in the 1930s, this technique only became relevant with the introduction of the vinyl discs (Mumma et al [no date]; Ghassaei 2012) .
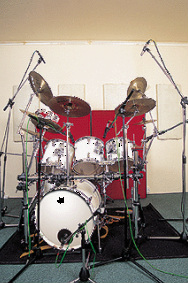
Two-track tape introduced a new recording practice that became know as multitrack recording. This process involves the simultaneous or consecutive synchronized recording of multiple tracks. Each track usually carries a single instrument. At first, recording a song using this technique used to take a lot of time. Once the two-track tape was introduced, two tracks could be recorded in one tape; these two tracks could then be bounced into one track of a second two-track tape; the process could then be repeated until the song was finished. New types of magnetic tape that could support more tracks and new analogue mixing console would then be introduced. Up to 24 tracks could then be recorded on tape, up to two inches wide. Some studios were able to offer 48-track recording by linking two 24-track consoles (Sound City 2013; Mumma et al [no date]). Multitrack recording allowed the artist to record in one of the tracks while listening to some of the tracks previously recorded.
One of the great advantages that recording on tape brought was the possibility to manipulate audio as a physical entity; this could be done by cutting the tape at the required point and rejoining it to another section of tape, using adhesive tape or sometimes glue. This technique was called splice and in order to avoid any unwanted noise, the cut should be made at an angle so that any click introduced by the cut was spread over a few milliseconds (Mumma et al [no date]).
One of the most famous analogue mixing consoles is the Neve 8078 and is considered by many experts unique. The characteristic Neve sound has featured in numerous hit records including Neil Young, Fleetwood Mac, Cheap Trick, Fear, Tom Petty and the Heartbreakers, Santana, Rick Springfield, Nirvana, Rage Against the Machine, Queens of the Stone Age, Metallica, Johnny Cash, Kings of Leon. All these artists recorded some of their albums in Sound City Studios located in LA, California (Sound City 2013).
In 1966, Philips introduced the stereophonic compact cassette and the machine on which it could be used. The compact cassette consisted of a sealed case containing a miniature reel-to-reel tape. By 1980 albums were issued in two formats: disc and cassette (Mumma et al [no date]).
The Digital Era
In the mid-1970s the recording industry started to employ digital technology for recording. Digital recording techniques use digital technology in combination with analogue techniques or instead of these. In the early 1980 a new format was introduced, the compact disc. This medium was based entirely on digital recording and playback technology. Discs recorded by analogue methods were unable to reproduce the sound with accuracy at the extremes of the frequency range and the contact between the surface and the stylus created surface noise during playback. Digital recording aimed to solve these problems. By the mid-1980s music had started to be released in compact disc and a few years later the compact disc would end up replacing the 12-inch disc (Ibidem).
The full range of human hearing is between 20Hz and 20kHz therefore, according to the sampling theorem, the minimum sample rate that satisfies these conditions is 40kHz. That is why a digital recorder sampled the sound signal 44,100 times per second (frequency of 44,1 kHz). Nowadays technology already allows recording at higher sample rates. The most common ones in digital audio are 48 kHz, 88.2 kHz, 96kHz and 192kHz (Self, D. 2012; Ellert).
In its first years the compact disc used 16-digit codes for recording and playback. 16-bit technology allowed nearly 66,000 possible timbres. The industry later on introduced 20-bit recording (more than 1 million possible timbres) and 24-bit recording. These recording formats would then have to be translated into 16-bit format for playback (Mumma et al [no date]; anon. [no date]).
One of the advantages of the compact disc and digital formats is that the stored signal never loses its original sound quality and can be copied many times with no audible change. A compact disc allows a standard playing time of 74 minutes but discs with a maximum playing time of 81 minutes can be issued. In 1999 two formats emerged: the DVD, used for digital video, with the capacity to support surround sound; and the Super Audio CD, that utilizes a faster and simplified type of sampling which more closely approximates an analogue sound wave and offer a maximum playing time of 110 minutes (ibidem).
There are different formats in which a song can be saved on our computers. Some of the most common formats are WAV, AIFF and MP3 (compressed format). iTunes and similar platforms that sell music online allow people to purchase music in a digital format, where people no longer have a physical copy of the album. In the last few years, platforms like YouTube and more recently Spotify introduced streaming. Streaming means listening to music or watching video in ‘real time’ instead of downloading a file into the computer and watching it later (WebWise Team 2012). Spotify allows the user to pay a monthly subscription that gives him permission to listen to unlimited music (spotify website).
Digital technology has brought changes not only in terms of the formats but also in terms of mixing consoles. Digital mixing desks were introduced and computers started to replace magnetic tape for recording. At first the computers were slow and the simple process of bouncing a song could take a couple of hours (Sound City 2013). Nowadays this is not a problem any more and software like Pro Tools, Cubase, Logic Pro made things much easier. It is now possible to edit and mix a song much more quickly and small imperfections in songs can be easily fixed. With the introduction of Digital Audio Workstations (DAWs) recording a song is no longer a problem and creating a “home studio” is something accessible to a lot of people. Editing also became a non-destructive process, as computers should retain a copy of the original recording (Inglis 2011; Anon. [no date]). Pro Tools also made possible quantizing sound with its Elastic Audio tool.
Digital technology revolutionized the recording industry and introduced new ways of recording. An artist no longer needs to be a good musician and be ready to go into a recording session in order to record a song. One of the advantages of Analogue Recording is the need for a band to be tight and ready to record a song. Analogue methods made a musician interact and play with other creative minds, developing their music and skills. Then they would go in the studio and there was something magical when a band was getting recorded and managed to play the whole song for the first time. The feel captured in these situations by tape is something extraordinary. Analogue mixing desks have their own sound because of their components and the way they are built, and there is no doubt that a mixing desk can be responsible for the sound in an album (Sound City 2013).
One of the disadvantages of tape is the price. Because the demand has gone down, the prices have gone up. Maintaining an analogue console can be quite expensive. What a lot of people that love the analogue sound might do is record some elements, like drums, and then transfer it to digital (Liljeblad [no date]).
A lot of people, engineers and musicians still love the imperfections associated with analogue signal processing and the bleeding generated by some analogue components (Cooper 2004). These factors associated with the human feel, passion and skill are some of the reasons why we still find early recordings from the 50s, 60s and 70s so exciting and inspiring.
References
- Anon. [No date]. [Online]. Available from:
http://www.bbc.co.uk/learningzone/clips/recording-sound-analogue-vs-digital/5977.html
[Accessed 3 May 2013].
- Cooper, P. 2004. Is analogue mixing superior to digital summing?. [Online]. Available from:
http://www.soundonsound.com/sos/jun04/articles/qa0604-5.htm
[Accessed 3 May 2013]
- Elert, G. [No date]. [Online]. Available from:
http://hypertextbook.com/facts/2003/ChrisDAmbrose.shtml
[Accessed 3 May 2013].
- Ghassaei, A. 2012. 3D Printed Record. [Online]. Available from:
http://www.instructables.com/id/3D-Printed-Record/
[Accessed 5 May 2013].
- Ghassaei, A. 2012. Step 1: How does a record work?. [Online]. Available from:
http://www.instructables.com/id/3D-Printed-Record/
[Accessed 5 May 2013].
- Mumma, G., et al. [No date]. Recording. In: Kernfeld, B, ed. The New Grove Dictionary of Jazz. 2nd ed.
Oxford Music Online. Oxford University Press. [Accessed 29 April 2013].
- Inglis, S. 2011. Audio Editing in DAWs. [Online]. Availble from:
http://www.soundonsound.com/sos/feb11/articles/editing-1.htm
[Accessed 3 May 2013].
- Liljeblad, U. [No date]. Digital vs. Analogue – Recording. [Online]. Available from:
http://www.mix-engineer.com/audio-philosophy/digital-vs-analog-recording/
[Accessed 26 April 2013].
- Self, D. 2012. Audio Engineering Explained. Taylor & Francis US.
- Sound City. 2013. Music Documentary. Directed by Dave Grohl. Roswell Films.
- WebWise Team. 2012. What is streaming?. [Online] Available from:
http://www.bbc.co.uk/webwise/guides/about-streaming
[Accessed 3 May 2013].
The idea of recording sounds and music became a reality at the end of the 19th century. In 1877, Thomas Edison invented the first sound-recording mechanism practical for commercial use. Edison's device consisted of a phonograph that used a wax cylinder, about five to six inches long, and utilized a recording technique called hill-and-dale. In the decade that followed the invention of the phonograph, other recording devices were created such as a flat recording disc of wax-coated cardboard by Alexander Bell, Chichester Bell and Charles Tainter, and the disc phonograph by Emile Berliner (Mumma et al [no date]).
The first recording devices were used mainly for communications, business, stenography, telegraphy and entertainment to some extent. Berliner was the first to use his recording device for entertainment and cultural purposes. Berliner's machine would become the standard method of commercial disc recording until the introduction of the stereophonic recording in the 1950s (Ibidem).
In 1898, Valdemar Poulsen demonstrated the principle for magnetic recording in his telegraphone. However, it wasn't until the advent of electronic amplification that the musical potential of this technique could be realised. In 1947, the Ampex Corporation, produced the first high quality magnetic recorder for studio use in the USA. The main advantages of tape over the disc phonograph were the relative ease of editing and the substantially lower cost (Ibidem).
Around this time, some important changes occurred in the area of disc recording with the development of polyester plastics, called polyvinyl chloride (PVC) or "vinyl", which had a smaller grain structure than shellac (of which 78 r.p.m. discs were commonly made). Vinyl discs allowed the recording of a wider range of frequencies and dynamics, and suffered considerably less from surface noise. The new discs gave better fidelity and were less fragile than the previous ones (Ibidem).
The arrival of the vinyl led to the fixing of new standard speeds for recording and playback. In 1948 Columbia introduced the 331/3 r.p.m. “long-playing” disc which allowed up to 25 minutes of music on each side. The 12 inch, 331/3 r.p.m, quickly became standard replacing multiple-disc albums of 78 r.p.m. The 45 r.p.m., 7-inch “single”, replaced the 78 r.p.m. “single” disc (with a similar playing time of two to four minutes). Two variants of the 45 r.p.m. disc would be introduced such as the 7-inch EP (two tracks on each side, running for twice as long as single) and the 12-inch single that had a playing time of 12 minutes per side (Ibidem).
A decrease in the cost of materials, manufacturing, and distribution made these discs more affordable than before. The use of easily edited magnetic tape also improved the efficiency of the record companies’ operations. These factors led to the expansion of the recording industry.
In 1957 the recording industry introduced stereophonic discs. The technique of stereophonic (stereo) recording and playback produces the effect of sound coming from different directions in a three-dimensional space. This technique could only be developed after the invention of the two-track magnetic tape. The reason behind it is that in order to create this effect, two channels have to be recorded and played independently. On a microgroove disc the two channels are recorded as independent variations in the left and right walls of a V-shaped groove (Picture on the right). Although some stereo recordings were made in the 1930s, this technique only became relevant with the introduction of the vinyl discs (Mumma et al [no date]; Ghassaei 2012) .
Two-track tape introduced a new recording practice that became know as multitrack recording. This process involves the simultaneous or consecutive synchronized recording of multiple tracks. Each track usually carries a single instrument. At first, recording a song using this technique used to take a lot of time. Once the two-track tape was introduced, two tracks could be recorded in one tape; these two tracks could then be bounced into one track of a second two-track tape; the process could then be repeated until the song was finished. New types of magnetic tape that could support more tracks and new analogue mixing console would then be introduced. Up to 24 tracks could then be recorded on tape, up to two inches wide. Some studios were able to offer 48-track recording by linking two 24-track consoles (Sound City 2013; Mumma et al [no date]). Multitrack recording allowed the artist to record in one of the tracks while listening to some of the tracks previously recorded.
One of the great advantages that recording on tape brought was the possibility to manipulate audio as a physical entity; this could be done by cutting the tape at the required point and rejoining it to another section of tape, using adhesive tape or sometimes glue. This technique was called splice and in order to avoid any unwanted noise, the cut should be made at an angle so that any click introduced by the cut was spread over a few milliseconds (Mumma et al [no date]).
One of the most famous analogue mixing consoles is the Neve 8078 and is considered by many experts unique. The characteristic Neve sound has featured in numerous hit records including Neil Young, Fleetwood Mac, Cheap Trick, Fear, Tom Petty and the Heartbreakers, Santana, Rick Springfield, Nirvana, Rage Against the Machine, Queens of the Stone Age, Metallica, Johnny Cash, Kings of Leon. All these artists recorded some of their albums in Sound City Studios located in LA, California (Sound City 2013).
In 1966, Philips introduced the stereophonic compact cassette and the machine on which it could be used. The compact cassette consisted of a sealed case containing a miniature reel-to-reel tape. By 1980 albums were issued in two formats: disc and cassette (Mumma et al [no date]).
The Digital Era
In the mid-1970s the recording industry started to employ digital technology for recording. Digital recording techniques use digital technology in combination with analogue techniques or instead of these. In the early 1980 a new format was introduced, the compact disc. This medium was based entirely on digital recording and playback technology. Discs recorded by analogue methods were unable to reproduce the sound with accuracy at the extremes of the frequency range and the contact between the surface and the stylus created surface noise during playback. Digital recording aimed to solve these problems. By the mid-1980s music had started to be released in compact disc and a few years later the compact disc would end up replacing the 12-inch disc (Ibidem).
The full range of human hearing is between 20Hz and 20kHz therefore, according to the sampling theorem, the minimum sample rate that satisfies these conditions is 40kHz. That is why a digital recorder sampled the sound signal 44,100 times per second (frequency of 44,1 kHz). Nowadays technology already allows recording at higher sample rates. The most common ones in digital audio are 48 kHz, 88.2 kHz, 96kHz and 192kHz (Self, D. 2012; Ellert).
In its first years the compact disc used 16-digit codes for recording and playback. 16-bit technology allowed nearly 66,000 possible timbres. The industry later on introduced 20-bit recording (more than 1 million possible timbres) and 24-bit recording. These recording formats would then have to be translated into 16-bit format for playback (Mumma et al [no date]; anon. [no date]).
One of the advantages of the compact disc and digital formats is that the stored signal never loses its original sound quality and can be copied many times with no audible change. A compact disc allows a standard playing time of 74 minutes but discs with a maximum playing time of 81 minutes can be issued. In 1999 two formats emerged: the DVD, used for digital video, with the capacity to support surround sound; and the Super Audio CD, that utilizes a faster and simplified type of sampling which more closely approximates an analogue sound wave and offer a maximum playing time of 110 minutes (ibidem).
There are different formats in which a song can be saved on our computers. Some of the most common formats are WAV, AIFF and MP3 (compressed format). iTunes and similar platforms that sell music online allow people to purchase music in a digital format, where people no longer have a physical copy of the album. In the last few years, platforms like YouTube and more recently Spotify introduced streaming. Streaming means listening to music or watching video in ‘real time’ instead of downloading a file into the computer and watching it later (WebWise Team 2012). Spotify allows the user to pay a monthly subscription that gives him permission to listen to unlimited music (spotify website).
Digital technology has brought changes not only in terms of the formats but also in terms of mixing consoles. Digital mixing desks were introduced and computers started to replace magnetic tape for recording. At first the computers were slow and the simple process of bouncing a song could take a couple of hours (Sound City 2013). Nowadays this is not a problem any more and software like Pro Tools, Cubase, Logic Pro made things much easier. It is now possible to edit and mix a song much more quickly and small imperfections in songs can be easily fixed. With the introduction of Digital Audio Workstations (DAWs) recording a song is no longer a problem and creating a “home studio” is something accessible to a lot of people. Editing also became a non-destructive process, as computers should retain a copy of the original recording (Inglis 2011; Anon. [no date]). Pro Tools also made possible quantizing sound with its Elastic Audio tool.
Digital technology revolutionized the recording industry and introduced new ways of recording. An artist no longer needs to be a good musician and be ready to go into a recording session in order to record a song. One of the advantages of Analogue Recording is the need for a band to be tight and ready to record a song. Analogue methods made a musician interact and play with other creative minds, developing their music and skills. Then they would go in the studio and there was something magical when a band was getting recorded and managed to play the whole song for the first time. The feel captured in these situations by tape is something extraordinary. Analogue mixing desks have their own sound because of their components and the way they are built, and there is no doubt that a mixing desk can be responsible for the sound in an album (Sound City 2013).
One of the disadvantages of tape is the price. Because the demand has gone down, the prices have gone up. Maintaining an analogue console can be quite expensive. What a lot of people that love the analogue sound might do is record some elements, like drums, and then transfer it to digital (Liljeblad [no date]).
A lot of people, engineers and musicians still love the imperfections associated with analogue signal processing and the bleeding generated by some analogue components (Cooper 2004). These factors associated with the human feel, passion and skill are some of the reasons why we still find early recordings from the 50s, 60s and 70s so exciting and inspiring.
References
- Anon. [No date]. [Online]. Available from:
http://www.bbc.co.uk/learningzone/clips/recording-sound-analogue-vs-digital/5977.html
[Accessed 3 May 2013].
- Cooper, P. 2004. Is analogue mixing superior to digital summing?. [Online]. Available from:
http://www.soundonsound.com/sos/jun04/articles/qa0604-5.htm
[Accessed 3 May 2013]
- Elert, G. [No date]. [Online]. Available from:
http://hypertextbook.com/facts/2003/ChrisDAmbrose.shtml
[Accessed 3 May 2013].
- Ghassaei, A. 2012. 3D Printed Record. [Online]. Available from:
http://www.instructables.com/id/3D-Printed-Record/
[Accessed 5 May 2013].
- Ghassaei, A. 2012. Step 1: How does a record work?. [Online]. Available from:
http://www.instructables.com/id/3D-Printed-Record/
[Accessed 5 May 2013].
- Mumma, G., et al. [No date]. Recording. In: Kernfeld, B, ed. The New Grove Dictionary of Jazz. 2nd ed.
Oxford Music Online. Oxford University Press. [Accessed 29 April 2013].
- Inglis, S. 2011. Audio Editing in DAWs. [Online]. Availble from:
http://www.soundonsound.com/sos/feb11/articles/editing-1.htm
[Accessed 3 May 2013].
- Liljeblad, U. [No date]. Digital vs. Analogue – Recording. [Online]. Available from:
http://www.mix-engineer.com/audio-philosophy/digital-vs-analog-recording/
[Accessed 26 April 2013].
- Self, D. 2012. Audio Engineering Explained. Taylor & Francis US.
- Sound City. 2013. Music Documentary. Directed by Dave Grohl. Roswell Films.
- WebWise Team. 2012. What is streaming?. [Online] Available from:
http://www.bbc.co.uk/webwise/guides/about-streaming
[Accessed 3 May 2013].

 RSS Feed